
Are you trying to transfer your contacts from Android phone to iPhone 4?, sometimes your SIM can accommodate number of contacts you have, but not with all details. But, how about having more than 1000 contacts that need to be transferred without losing any information to iPhone 4 from Android phone?. I did this exercise few days ago and I’m sharing here how to transfer contacts from Android to iPhone 4 by using Windows computer.
What I meant by ‘Windows Computer’?, because you do not need Mac computer or any wireless sync services. I had to transfer contacts from Huawei Android phone to brand new iPhone 4 without losing any details. Its very simple, just understand the process then you can make it by your self.
What you need?
1) Connectivity of Android phone to Windows computer.
2) The Android software to synchronize your contacts to MS Outlook. This small software comes with Android phone package to make the connection to computer.
3) Microsoft Outlook
4) iPhone connectivity to same Windows computer.
5) iTunes software
2) The Android software to synchronize your contacts to MS Outlook. This small software comes with Android phone package to make the connection to computer.
3) Microsoft Outlook
4) iPhone connectivity to same Windows computer.
5) iTunes software
Steps to Transfer contacts from Android phone to iPhone 4
In nutshell, you need to synchronize the Android phone contacts to computer outlook. Then connect the iPhone to same computer and synchronize the Outlook contacts to new iPhone, that’s it. The Android phone software and iTunes should see the same outlook profile if you have more outlook profiles in same computer.
Step by Step Methods
If you already have a outlook email account with contacts in particular computer, then I suggest to create a new profile with dummy email address. This helps in avoiding conflicts or over writing of contacts.
1) Create a new Outlook profile for the contacts transfer purpose.
2) Connect the Android phone to computer. Make sure phone connectivity and synchronization software is already installed.
3) Open the software and select the synchronization options like emails, contacts and calendars. In this example I go with contacts. Set the options properly in conflict area which decides the transfer behavior when a same contact is found in Android phone and Outlook profile. Since we use blank outlook profile, its not an issue here, but when you use with your existing profile it may overwrite duplicate contacts either on device or Outlook.
Start the sync in android software and make sure all contacts are moved to outlook.
Start the sync in android software and make sure all contacts are moved to outlook.
Before go to next step, I recommend to take a backup of these contacts as PST file and save in different place, more information available here in Microsoft site.
4) Disconnect the Android phone and connect iPhone 4 now.
5) Start the iTunes, if this is the first time you are connecting the iPhone to this computer, then you need to create partnership for this phone. Once the iPhone4 listed under devices, then continue to the next steps.

6) Under Info tab, you will find the options to select the Contacts sync with computer Outlook and iPhone 4 you connected.
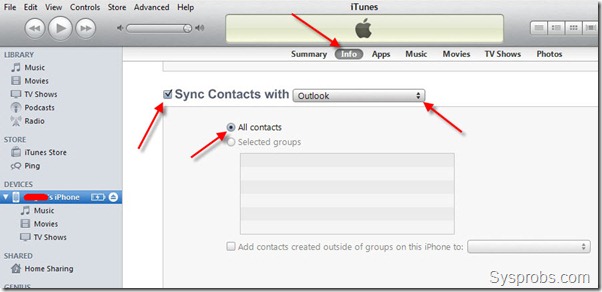
Since our Android phone contacts are moved to Outlook profile, now we have to select Outlook as source to transfer the contacts.
Go down to Advanced settings and set the appropriate option to sync (replace) the iPhone 4 data during the next sync. I suggest to not to select this, better do it manually when ever wanted.

7) If automatic sync doesn’t start after pressing OK, then you can do it manually by right clicking the iPhone under devices and select Sync.

Now, the contacts in Outlook which you transferred from Android phone will be transferred to iPhone 4. Again, make sure number of transferred contacts are matching from the original source.
Most of the time these contacts will be transferred with proper format and information including Work, home, mobile telephone numbers and email addresses.
I’m sure this guide would be helpful on how to transfer contacts from Android to iPhone 4 by using Windows computer, I have used Windows 7 for this purpose and managed to complete successfully.
No comments:
Post a Comment