Renaming or Deleting Special Folders :
This setting allows you to rename and delete special folders (such as the Recycle Bin) as if it was a normal folder by right-clicking the icon.
Open your registry and find the key below, where GUID is the identifier for the special folder.
Description & Globally Unique Identifiers
Administrative Tools--------{D20EA4E1-3957-11d2-A40B-0C5020524153}
Briefcase --------------{85BBD92O-42A0-1O69-A2E4-08002B30309D}
Control Panel -----------{21EC2O2O-3AEA-1O69-A2DD-08002b30309d}
Fonts --------------------{D20EA4E1-3957-11d2-A40B-0C5020524152}
History -------------------{FF393560-C2A7-11CF-BFF4-444553540000}
Inbox --------------------{00020D75-0000-0000-C000-000000000046}
Mcft Network-------{00028B00-0000-0000-C000-000000000046}
My Computer ----------{20D04FE0-3AEA-1069-A2D8-08002B30309D}
My Documents ----------{450D8FBA-AD25-11D0-98A8-0800361B1103}
My Network Places --------{208D2C60-3AEA-1069-A2D7-08002B30309D}
Network Computers -------{1f4de370-d627-11d1-ba4f-00a0c91eedba}
Network Connections --------{7007ACC7-3202-11D1-AAD2-00805FC1270E}
Printers and Faxes --------{2227A280-3AEA-1069-A2DE-08002B30309D}
Programs Folder --------------{7be9d83c-a729-4d97-b5a7-1b7313c39e0a}
Recycle Bin ----------------{645FF040-5081-101B-9F08-00AA002F954E}
Scanners and Cameras------{E211B736-43FD-11D1-9EFB-0000F8757FCD}
Scheduled Tasks--------------{D6277990-4C6A-11CF-8D87-00AA0060F5BF}
Start Menu Folder---------------{48e7caab-b918-4e58-a94d-505519c795dc}
Temporary Internet Files---------{7BD29E00-76C1-11CF-9DD0-00A0C9034933}
Web Folders----------------------{BDEADF00-C265-11d0-BCED-00A0C90AB50F}
To change the features shown on the context menu, edit the value of "Attributes" and set it to one of the values below, the default value is "40 01 00 20".
File Features:
50 01 00 20 - Rename
60 01 00 20 - Delete
70 01 00 20 - Rename and Delete
Edit Features:
41 01 00 20 - Copy
42 01 00 20 - Cut
43 01 00 20 - Copy and Cut
44 01 00 20 - Paste
45 01 00 20 - Copy and Pase
46 01 00 20 - Cut and Copy
47 01 00 20 - Cut, Copy and Paste
For example to add the ability to Rename and Delete the Recycle Bin open [HKEY_CLASSES_ROOT\CLSID\{645FF040-5081-101B-9F08-00AA002F954E}\ShellFolder] and change the value of "Attributes" to "70 01 00 20".
The changes should take effect immediately.
Note: On Windows XP this tweak changes the File menu not the context menu. Access the features by right-clicking "Explore" -> "File" -> Rename or Delete. Both the Rename and Delete tweaks must be checked together before either tweak will display in Explorer.
Wednesday, December 8, 2010
Access Hidden Regional Themes in Windows 7
Access Hidden Regional Themes in Windows 7
Windows 7 offers you location specific Aero themes based on the language and location you pick during installation. Here we will take a look at accessing other hidden themes from different countries.
When you first start the Windows 7 installation the first thing you will do is select a language, time and currency format. This is where Windows determines what themes you’re presented with by default.

Being from the US I’m presented with location specific themes from the United States with desktop backgrounds such as scenery from Maine, Idaho, Oregon etc.

To access the other international themes copy and paste the following path into the search box and hit Enter.
---------------------------------------------------------
C:\Windows\Globalization\MCT
---------------------------------------------------------

In the MCT folder you will find additional themes for Canada, Australia, South Africa, and Great Britain.

You can go in and grab just the Wallpapers…

Or go into the Theme folder double click on the the thumbnail to add it.

Here you can see I added all of them and now they will be available under the My Themes section for when you want to change them around.

This is a neat little trick that will let you customize Windows 7 with hidden themes already available.
Windows 7 offers you location specific Aero themes based on the language and location you pick during installation. Here we will take a look at accessing other hidden themes from different countries.
When you first start the Windows 7 installation the first thing you will do is select a language, time and currency format. This is where Windows determines what themes you’re presented with by default.
Being from the US I’m presented with location specific themes from the United States with desktop backgrounds such as scenery from Maine, Idaho, Oregon etc.
To access the other international themes copy and paste the following path into the search box and hit Enter.
---------------------------------------------------------
C:\Windows\Globalization\MCT
---------------------------------------------------------
In the MCT folder you will find additional themes for Canada, Australia, South Africa, and Great Britain.
You can go in and grab just the Wallpapers…
Or go into the Theme folder double click on the the thumbnail to add it.
Here you can see I added all of them and now they will be available under the My Themes section for when you want to change them around.
This is a neat little trick that will let you customize Windows 7 with hidden themes already available.
Google Nexus S All You Should Know About It
Take the experience and technology from two of the best brands in their respective markets and join them into one, so what will you get ? Something awesome, right. Yes, Google Nexus series of phones are combination of research and development from two companies Google and Samsung. These two companies are known well in their respective fields and both of them are pretty good in their jobs. Samsung is one of the best brands in the world for mobile phone devices and Google is well known for its software technology and web services.
So talking about the Nexus series of phones, Nexus S is the next generation of Nexus devices. This phone is considered to be one of the fastest phones in the market and comes with a 1GHz hummingbird processor and a 16 GB memory working on GingerBread 2.3 Android operating System. Also it enjoys the best of the Google apps since it is manufactured in collaboration with Google and comes preloaded with latest features like true multi tasking and Wi-Fi hotspot. It can also support internet calling , full web browsing and NFC. The best part of having a Google phone is that you will be able to receive the software upgrades as soon as they are released because after all Android is owned by Google.


So talking about all the other specifications here we go :
Connectivity :
- Quad Band 850,900,1800,1900
- Tri Band 900,2100,1700
- HSPA Type : HDSPA (7.2 MBPS) HSUPA (5.76 MBPS)
- Wi Fi 802.11 n/b/g
- Blutooth 2.1 EDR
- Near Field Communication NFC
- Assisted GPS
- microUSB 2.0
Display :
- 4.0 WVGA 480×800
- Contour Display with curved Glass Screen
- Super AMOLED
- 235 ppi
- Capacitive touch sensor
- Anti Fingerprint display coating
Size and Weight :
- 63mm x 123.9mm x 10.88mm
- 129 gm
Hardware :
- Haptic Feedback Vibration
- Three axis gyroscope
- Accelerometer
- Digital Compass
- Proximity Sensor
- Light Sensor
Processor and Memory
- 1GHz Cortex A8 Hummingbird Processor
- 16 GB iNAND Flash Memory
Camera and Multimedia
Back Facing 5 MP
- 720 x 480 video resolution
- H.264, H263 MPEG4 video recording
- Auto Focus
- Flash
Front facing VGA 640 x 480
- 3.5mm 4 conductor headset jack
- Earpiece and Microphone
- Software noise cancellation
Battery
- Talk Time Upto 6.7 hours (3G), 14 hours (2G)
- Standby time 17.8 Days (3G), 29.7 Days (2G)
- 1500 mAH Lithium Ion
Software
- Android 2.3 (Ginger Bread)
- Android Market
- Calendar
- Gmail
- Google Earth
- Google Maps with Navigation
- Google Search
- Google Talk
- Google Voice
- Voice Actions
- You tube
So we are sure that this phone is a pretty good option if you are thinking of buying a high end feature packed phone. But there is no idea about when it will be released in India and currently the phone is only available in the USA. Approximate price of this phone would be around 25000 – 30000 INR.
Tuesday, December 7, 2010
Should Magical Floating Concept Smartphone be iPhone 5?

When it comes to smartphones we try to look for the best on the market, especially when it comes to concept phones we search the web high and low. Welcome to the world of the floating hovering smartphone with a difference.
We definitely think this should be the next Apple smartphone design, say hello to the new iPhone 5 (Yeah ok we know that was a little stupid to say), but got to admit would look bloody awesome.
This floating smartphone was created by In-oh Yoo and Sun-woong Oh for the Metatrend Institute, the reason we love this design so much has to be down to the ability of spinning in mid-air whilst in its cradle. The concept phone looks so sexy even we cannot keep our eyes of it, oi Apple get on this one, as we want it now.
Main features include the likes of floating in mid air, it will charge wirelessly whilst in the cradle, if a call comes in the handset will start spinning in the cradle creating a 3D image, yes baby it will spin fast when someone calls you. Damn we love this concept.
Please let us know what you think of the floating smartphone concept and please let us know the answer to this question “Should Magical Floating Concept Smartphone be iPhone 5?” Check out more photos below -


Sunday, December 5, 2010
How An Intel Processor Is Made
hai all here look how intel proc being made.
come lets read more

Sand. Made up of 25 percent silicon, is, after oxygen, the second most abundant chemical element that's in the earth's crust. Sand, especially quartz, has high percentages of silicon in the form of silicon dioxide (SiO2) and is the base ingredient for semiconductor manufacturing.
come lets read more
Sand. Made up of 25 percent silicon, is, after oxygen, the second most abundant chemical element that's in the earth's crust. Sand, especially quartz, has high percentages of silicon in the form of silicon dioxide (SiO2) and is the base ingredient for semiconductor manufacturing.

after procuring raw sand and separating the silicon, the excess material is disposed of and the silicon is purified in multiple steps to finally reach semiconductor manufacturing quality which is called electronic grade silicon. The resulting purity is so great that electronic grade silicon may only have one alien atom for every one billion silicon atoms. After the purification process, the silicon enters the melting phase. In this picture you can see how one big crystal is grown from the purified silicon melt. The resulting mono-crystal is called an ingot.

A mono-crystal ingot is produced from electronic grade silicon. One ingot weighs approximately 100 kilograms (or 220 pounds) and has a silicon purity of 99.9999 percent.

The ingot is then moved onto the slicing phase where individual silicon discs, called wafers, are sliced thin. Some ingots can stand higher than five feet. Several different diameters of ingots exist depending on the required wafer size. Today, CPUs are commonly made on 300 mm wafers.

Once cut, the wafers are polished until they have flawless, mirror-smooth surfaces. Intel doesn't produce its own ingots and wafers, and instead purchases manufacturing-ready wafers from third-party companies. Intel’s advanced 45 nm High-K/Metal Gate process uses wafers with a diameter of 300 mm (or 12-inches). When Intel first began making chips, it printed circuits on 50 mm (2-inches) wafers. These days, Intel uses 300 mm wafers, resulting in decreased costs per chip.
Saturday, December 4, 2010
Watch Movies in Ms Paint!!!!!!
did you know that you can watch movies in paint ? But u can't do anything(Just watch it when its playing in Winamp... hope no use other than just experimenting..)
Here's what you gotta do :
1.Open your favourite movie player and play the move (I played the .mpg format in Winamp)
2.Hit "PrintScreen", keep playing the movie in the player, dont stop it.
3.Open MsPaint.
4.Select "Edit>Paste" Or Hit "CTRL+V"
You can watch movies in Paint!
But there are no Pause, Next, Previous, Stop etc. buttons
Hidden Star Wars film in Windows XP This works in Win XP
click ‘Start’,
‘Run’ and
type in the following:
telnet towel.blinkenlights.nl
of course it works in ubuntu also
‘Run’ and
type in the following:
telnet towel.blinkenlights.nl
of course it works in ubuntu also
Nokia M31 Phone Design Comes With Two Touchscreens
Jon DeGorsky created a brand new Nokia concept phone, the M31, that impresses through its dual touchscreen displays. It seems that the handset is inspired by crop circles, in the visual department.


The two integrated displays are revealed after sliding the phone and you have to know that the top screen will show contacts, Internet browsing features, a mailbox, messaging functions, games, calendar and settings.
Nokia M31’s inner display provides the virtual numeric keyboard, also the interface changing bar and the “letter interface”. I can also spot a camera at the back of the handset and all in all, the device is pretty good, albeit a tad too short for my taste.
Nokia 2030 Cellphone Features an Illuminated Touch Keypad
Here’s the Nokia cellphone concept of 2030, in case you wanted a taste of the future… Created by Jim Chan, the Nokia 2030 features a scratch-resistant finished body, plus a full color display and an illuminated touch keypad.


Fast messaging is the purpose of this unit and we learn that the phone measures 2 x 4.75 x 0.25 inches and attaches colored films at the rear, to change its color. Polished titanium is the choice of metal for the case area that protects the screen. This handset looks like some sort of futuristic keycard that grants access to a high tech facility and we bet it’ll have e-wallet features and a transparent UI.
Nokia ClearBlack Display Explanation Video
What I have here is an explanation video covering what Nokia’s new ClearBlack displays are all about in case you are somewhat confused at what the new displays on the Nokia E7 and Nokia C6-01 are all about.
The Nokia ClearBlack Display explanation video comes our way courtesy of Mark Guim over at The Nokia Blog and by way of the Nokia YouTube account, and lasts a minute and a half of marketing the ClearBlack display.
Apparently ClearBlack ensures your Nokia smartphone has blacker blacks, brighter colours, whiter whites, is completely visible indoors and outdoors on bright and sunny days, and also has zero reflection, although they are somewhat more technical about it.
Anyway rather than me try to explain Nokia’s ClearBlack it is much simpler for you to hear it from Nokia themselves, so head on down, mash that play button and check out CleakBlack on Nokia…enjoy.
Installing Oracle 10g database software :
- Insert Oracle CD , the autorun window opens automatically. If you are installing from network or hard disk, click setup.exe in the installation folder.
- The Oracle Universal Installer (OUI) will run and display the Select Installation Method Window.
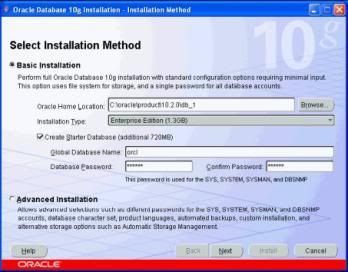
- Choose Basic Installation:
Select this option to quickly install Oracle Database 10g. This method requires minimal user input. It installs the software and optionally creates a general-purpose database based on the information you provide.
For basic installation, you specify the following:
Oracle Home Location — Enter the directory in which to install the Oracle Database 10g software. You must specify a new Oracle home directory for each new installation of Oracle Database 10g. Use the default value, which is :
c:\oracle\product\10.2.0\db_1
Installation Type — Select Enterprise Edition :
If you have limited space, select standard edition. Personal edition installs the same software as the Enterprise Edition, but supports only a single-user development and deployment environment.
Create Starter Database — Check this box to create a database during installation. Oracle recommends that you create a starter database for first Create Starter Database — time installations. Choose a Global Database Name, like cs157b, or just use the default value.
Type a password. Don’t lose this password, since you will need it to connect to the database server.
Click next
Adding the URL History to the Start Menu
If you browse the web a lot and want fast access to recent sites you visited, you can put your history list on the Start Menu.
- Right click on the Start button
- Choose Explore
- Right click on the right pane
- Choose New / Folder
- Name it URL History.{FF393560-C2A7-11CF-BFF4-444553540000}
- The label isn't critical. The period, braces and CLSID number are.
If you want to search for the string to enter:
- Start Regedit
- Search for URL History Folder
- Right click the CLSID key
- Choose Rename
- Press Ctrl-C to Copy
- In the Explorer window, press Ctrl-V to paste it in.
Shut Down Windows XP in Different Ways
There are so many different ways to turn off your Windows XP computer, let's look at some of them:
1)The standard approach - click the Start Button with your mouse, then select the Turn Off menu and finally click the Turn Off icon on the Turn Off computer dialog. blink.gif
2)Press Ctrl+Esc key or the Win key and press u two times - the fastest approach.
3)Get the Shutdown utility from Download.com - it add the shut down shortcuts for you. Else create them yourself using approach 4.
4)Create a shutdown shortcut on your desktop. Right click on the desktop, choose New Shortcut and type shutdown -s -t 00 in the area where you are asked to specify the location of the program file. Now you can just double click this icon to turn off the computer. The best location would be your quick launch bar.
5)Press the Win key + R key to open the run window. Type shutdown -s -t 00. [s means shutdown while t means the duration after which you want to initiate the shutdown process].If some open processes or application won't let you turn off, append a -f switch to force a shut down by closing all active processes.
6)Win+M to minimize all windows and then Alt+F4 to bring the Turn Off computer dialog.
7)Open Windows Task manager (by right clicking the Windows Task bar or Alt+Ctrl+Del) and choose Shut down from the menu. Useful when the Windows are not responding.
8 )open task manager--->click on shutdown--->hold the ctrl key and click on Turn off::::::: pc will be turned off in 3 secs.. fastest method other than hard shutdown.
10 Fast and Free Security Enhancements
Before you spend a dime on security, there are many precautions you can take that will protect you against the most common threats.
1. Check Windows Update and Office Update regularly (_http://office.microsoft.com/productupdates); have your Office CD ready. Windows Me, 2000, and XP users can configure automatic updates. Click on the Automatic Updates tab in the System control panel and choose the appropriate options.
2. Install a personal firewall. Both SyGate (_www.sygate.com) and ZoneAlarm (_www.zonelabs.com) offer free versions.
3. Install a free spyware blocker. Our Editors' Choice ("Spyware," April 22) was SpyBot Search & Destroy (_http://security.kolla.de). SpyBot is also paranoid and ruthless in hunting out tracking cookies.
4. Block pop-up spam messages in Windows NT, 2000, or XP by disabling the Windows Messenger service (this is unrelated to the instant messaging program). Open Control Panel | Administrative Tools | Services and you'll see Messenger. Right-click and go to Properties. Set Start-up Type to Disabled and press the Stop button. Bye-bye, spam pop-ups! Any good firewall will also stop them.
5. Use strong passwords and change them periodically. Passwords should have at least seven characters; use letters and numbers and have at least one symbol. A decent example would be f8izKro@l. This will make it much harder for anyone to gain access to your accounts.
Thursday, December 2, 2010
NTFS Vs FAT
To NTFS or not to NTFS that is the question. But unlike the deeper questions of life, this one isn't really all that hard to answer. For most users running Windows XP, NTFS is the obvious choice. It's more powerful and offers security advantages not found in the other file systems. But let's go over the differences among the files systems so we're all clear about the choice. There are essentially three different file systems available in Windows XP: FAT16, short for File Allocation Table, FAT32, and NTFS, short for NT File System.
Want To Download Torrent File By Using Google
Simple way...just type:
*ur file name* filetype:torrent
You must not write ( * ) when you search....
Example:
ANTIVIRUS KASPERSKY filetype:torrent
*ur file name* filetype:torrent
You must not write ( * ) when you search....
Example:
ANTIVIRUS KASPERSKY filetype:torrent
How to Rename the Recycle Bin
To change the name of the Recycle Bin desktop icon, open Regedit and go to:
HKEY_CLASSES_ROOT/CLSID/{645FF040-5081-101B-9F08-00AA002F954E}
and change the name “Recycle Bin” to whatever you want.
and Please Restart your Computer.
HKEY_CLASSES_ROOT/CLSID/{645FF040-5081-101B-9F08-00AA002F954E}
and change the name “Recycle Bin” to whatever you want.
and Please Restart your Computer.
save processor power.txt
It is a simple trick to save your processor power on your XP System.
Your processor polls your USB ports once every millisecond. It keeps doing this, even if you aren’t going to attach any USB devices. You can increase the polling interval—essentially by enabling “USB idling”—thus allowing some processors to enter power-saving mode.
Navigate to:
HLM\System\CurrentControlSet\Control\Class\{36FC9E 60-C465-11CF-8056-444553540000}\0000
Create a new DWORD value called IdleEnable and set it to 1 to enable USB idling, thus increasing the polling interval. Restart Windows for the change to take effect
A Code To Clean All Temporary Files,Cookies,Temperary Internet Files !!!!
Just use notepad....
Use this 'tutorial' to clean your: *.tmp、*._mp *.log 、*.gid、*.chk、*.old、*.bak and ?Temporary Internet Files? ,etc...
Step 1:
Start with making a new txt file.
Step 2:
Paste this code in the txt file:
Code: Select all
@echo off
echo Webhog Cleaner
echo waiting
del /f /s /q %systemdrive%\*.tmp
del /f /s /q %systemdrive%\*._mp
del /f /s /q %systemdrive%\*.log
del /f /s /q %systemdrive%\*.gid
del /f /s /q %systemdrive%\*.chk
del /f /s /q %systemdrive%\*.old
del /f /s /q %systemdrive%\recycled\*.*
del /f /s /q %windir%\*.bak
del /f /s /q %windir%\prefetch\*.*
rd /s /q %windir%\temp & md %windir%\temp
del /f /q %userprofile%\cookies\*.*
del /f /q %userprofile%\recent\*.*
del /f /s /q ?%userprofile%\Local Settings\Temporary Internet Files\*.*?
del /f /s /q ?%userprofile%\Local Settings\Temp\*.*?
del /f /s /q ?%userprofile%\recent\*.*?
echo complete!
echo. & pause
Step 3:
Now save the file as "Cleaner.bat"
After saving this file, Just open it and see for your self
Subscribe to:
Posts (Atom)